Add a new server to a DFS replication group
If a directory has previously been used for a DFSR share it will contain a DfsrPrivate directory. The existence of this directory will deem the new server MASTER no matter what. All other servers in the pool will be wiped and replicated from the new member.
The DsfrPrivate directory is HIDDEN and SYSTEM file. You must enable both view options to see it. It must be deleted prior to synching.
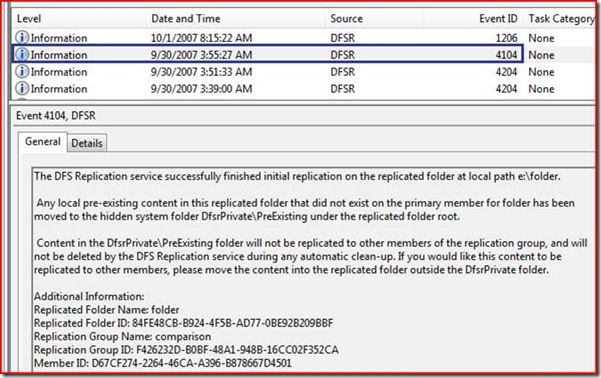
I have not tested this, but I believe as long as you replicate the data without DsfrPrivate the initialization will verify what does and does not already exist on the primary. Anything that does not exist will be moved to DsfrPrivate\PreExisting which you can later audit.
These are assumptions based on the wording of event 4104
Steps to add a new member
Using namespace pane
Using the namespace pane instead of replication pane tends to respect nested shares better. For instance \\contoso\departments\marketing will appear as \\contoso\marketing if shared via the replication pane.
- On the host create a directory of the same name as your namespace but append _share, this is where the data will be stored.
- Share the directory
- Right click > Properties > Sharing > Advanced Sharing > Permissions
- For "Everyone" tick "full control"
- Press "OK" twice to get back to Properties > Apply
- On the new server in the "Namespaces" section expand the Namespace in use and select the specific folder being altered.
- Right click folder and choose "Add folder target..."
- Browse to the desired path
- Choose "full mesh" instead of "bi-directional" via the radio buttons
- Press "Ok" and done.
Using replication pane
- (Optional) Add a new _share directory on the new server following Step 1 from Add a folder to a Namespace
- On any NamespaceServer right click the replicated share in the Replication pane, choose "New Member..."
- In the "Server" box enter the name of the new host being added to the pool, press "Next"
- Add all pool members from the left onto the right, to enable a full mesh replication, press "Next"
- We will leave the default replication schedule in place, just press "Next" to accept defaults
- We will be using the directory created in step 1. Press "Edit"
A. From an existing directory (optional step 1)
1. Click the "Enabled" radio button
2. Enter or browse to the directory where our files will be stored (created in step 1)
3. Press "OK" to close the dialog
B. Creating a new directory
1. Click the "Enabled" radio button
2. Enter or browse to the parent directory you want your share to be in. "Right click > New Folder" and give it a name. (Preferably following the _share scheme)
3. Press "OK" to close the dialog - You may have a second window resembling the first stating "The Wizard has detected that one or more replicated folders are a member of a DFS Namespace...." Just press "next" again
- You are presented with a summary screen, press "Create"
Pre-Seeding
When I pre-seeded I ended up getting many many files duped. This could cause space issues, and is clearly a waste of some time. I do not recommend pre-seeding.
See: Event 4412
If you want to pre-seed the basic steps are:
- emcopy the share from the old server to new preserving all a-times etc.
- Delete the DfsrPrivate directory from the root of the new servers share (Hidden and a System File)
- Add the folder as a target, when the sync occurs DFS will only copy differential data and tell you via event 4104 that the move was successful.